It started with the Huawei Honor 8, a phone with a camera good enough to make me question my Fujifilm obsession and collection of bodies and lenses. It continued with the Huawei Mate 9 with its higher specced camera and a screen that was large enough, bright enough, and color accurate enough to become primary device for image management, editing, and posting. Yes, the internal camera is great on its own, but combined with Fuji's film simulations and best in class jpeg output, the Huawei/Fuji combination has re-defined my photography.
Fujifilm Pre-Processing for Minimal Post-Processing
I am a lazy wannabe photographer. There was a time I used to shoot RAW and spend hours in post, sitting at a desktop, poking and prodding at images in Lightroom. Years ago when adopted a Chrombook for the majority of my work needs, I explored the available online tools for personal photography. I also had an Android tablet and used Snapseed as my go to image editor. Once Chromebooks gained the capability to run Android Apps, I happily used Snapseed on my Chromebook. The Huawei Mate 9 with its large (for a phone) 5.9" screen has simplified my equipment needs and workflow even further as I discovered that the Mate 9 provided a screen size and resolution suitable for editing images in Snapseed.
Fuji's in-camera Film Simulations also contributed to my laziness. Instead of spending time and effort post processing my images, I pre-process my images in the camera body by dialing in a film stock along with shadow, highlight, color, and sharpness adjustments which I feel will best benefit the scene. The electronic viewfinder lets me preview the image and make further adjustment on the fly using the lens' aperture ring and the camera's exposure compensation dial. I ride the exposure compensation dial heavily.
With the majority of work done in camera before I even take a picture, my work in post essentially consists of followup review and tweaks.
Basic Workflow
There is not much to it. After shooting, I transfer images to my phone either via Fuji wireless and the Fujifilm Camera Remote App, or more often, I transfer images via a USB cable with an OTG Cable Adapter. Wired image transfers are significantly faster than wireless image transfers.
Once the wired connected is made, the Google Photo app on my phone can import all images, or selected images, to a directory it creates using the camera's name. I then review the images Google Photo images on my phone and select the images I like and want to edit. I'll edit directly within Google Photos for simple edits, or choose an external image editor, such as Snapseed, as an advanced editor.
Here is my typical workflow summarized and visualized:
Snap Pics -> Beer -> Import -> Review -> Select -> Edit -> Save/Archive/Post - > Beer
Final edits are saved to the phone's Snapseed directory, where they can be backed up to Google Photos online and/or posted to Facebook, Flickr, or Instagram.
The image below, for example, was shot on an X-Pro2 using in-camera ACROS (R) film simulation with shadow, highlight, etc. preset and saved to the Quick Menu. What came out of the camera looked, to my eyes, pretty damn good, however I did use Snapseed to apply a slight crop and the healing tool to remove some large bird poop splats on the sidewalk. I've backed up the Snapseed image to Google Photos for later use or distribution.
Huawei, More than a digital darkroom
Any Android or Apple device can be used as a digital darkroom. What set the Huawei Mate 9 apart for me was the quality of its camera. Huawei's partnership with Leica brings a very capable combination in optics, software, and technology. In fact, after seeing the results I was getting with my original Honor 8 and continued and improved with the Mate 9's camera software combined with the Leica branded dual lenses, I sold my Fujifilm X70. I felt that my phone could now reasonably replace my high end walkabout camera.
I developed this concept a bit further and added a Shoulderpod to better grip the phone as a "proper" camera and mount it to a Ultrapod II mini-tripod. The Mate 9 is now the core of a powerful, yet minimal, travel kit.
Huawei Sample Images
Here is a sampling of images I've taken with either the Honor 8 or Mate 9 since this summer. The 16-9 aspect pictures in portrait mode were taken specifically for Instagram Stories.
Family Huawei Parade
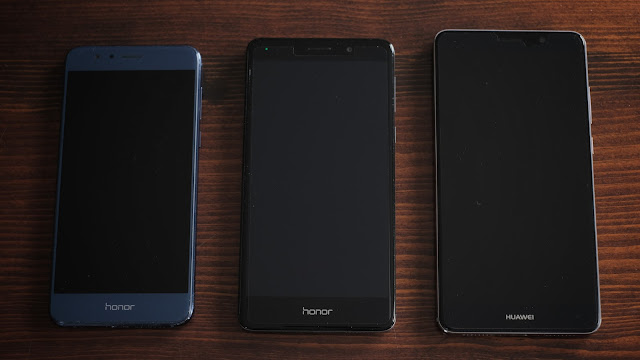
I once wrote a about having too many Fuji's. The same is coming true with Huawei. From left to right below are my wife's (used to be mine) Huawei Honor 8, my son's Huawei Honor 6x, and my Huawei Mate 9.
This is my Mate 9 showing the ultimate in single screen configurations. I got tired of swiping left and right to access apps on different screen, so I arranged my most used apps onto a single screen. Frequent apps are place on the screen. Secondary apps are in folders. All are stacked in four columns based on category, which are, from left to right: Huawei Apps, Google Apps, Internet and Media, and Photography. The left two columns contain work and productivity related apps and folders and the right two columns are for media and personal interests.
It is all very efficient taking me hours to develop a scheme that will save me milliseconds. Perhaps after a century of daily use I will enjoy the additional time savings.
Links for the Gear Obsessed:
- Huawei Unlocked Smartphones - Mate 9 - Honor 8 - Honor 6X
- Spigen Rugged Armor Cases - Mate 9 - Honor 8 - Honor 6X
- Shoulderpod S1 Professional Smartphone Rig, Tripod Mount, Filmmaker Grip
- Pedco UltraPod II Lightweight Camera Tripod
- Anker USB-C to USB 3.1 Adapter, Converts USB-C Female into USB-A Female, Uses USB OTG Technology


